Instructions
- Preheat your oven to 350°F (175°C). Line a baking sheet with parchment paper or a silicone baking mat.
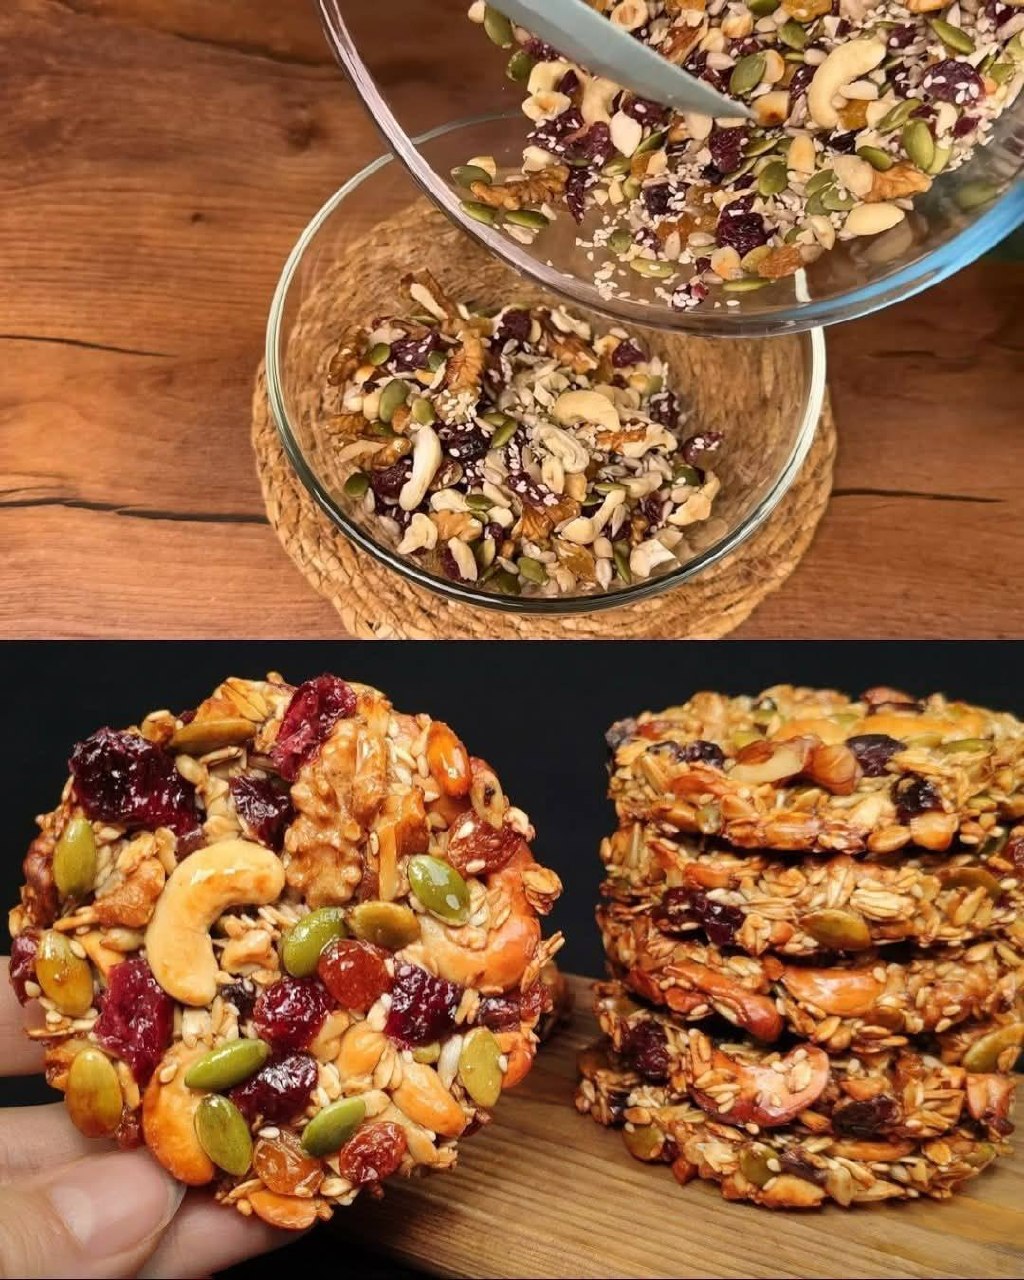
- In a large mixing bowl, combine the dry ingredients: rolled oats, chopped cashews, chopped walnuts, pumpkin seeds, sesame seeds, dried cranberries, raisins, ground cinnamon, and salt. Stir well to ensure all ingredients are evenly distributed.
- In a separate medium bowl, whisk together the wet ingredients: honey or maple syrup, melted coconut oil (or butter), large egg (or flax egg), and vanilla extract. Whisk until thoroughly combined.
- Pour the wet ingredient mixture into the large bowl with the dry ingredients. Use a sturdy spoon or spatula to mix everything together. Stir until all the dry ingredients are moistened and a cohesive dough forms. It should be sticky but hold its shape when pressed.
- Scoop about 1.5 to 2 tablespoons of the mixture for each cookie. Roll the mixture into a ball, then flatten it slightly into a disc, about 1/2 inch thick. Arrange the cookies on the prepared baking sheet, leaving about 1 inch of space between them. For a more uniform look, you can use a round cookie cutter or the rim of a glass to gently press around the edges after flattening.
- Bake for 12-15 minutes, or until the edges are golden brown and the centers are set. The cookies will still be soft when hot but will firm up as they cool.
- Remove the baking sheet from the oven and let the cookies cool on the sheet for 5-10 minutes before carefully transferring them to a wire rack to cool completely. Cooling completely is important for them to achieve their ideal chewy-crisp texture.
- Once completely cooled, store the cookies in an airtight container.
Cooking Tips and Variations
Achieving the perfect balance in these healthy oat cookies is all about the right ratios and quality ingredients. For best results, always use old-fashioned rolled oats rather than instant or quick oats, as they provide better texture and absorb moisture more effectively, preventing a mushy cookie. When mixing, ensure all the dry ingredients are thoroughly coated by the wet mixture; this creates a cohesive dough that holds together well during baking. Don’t overmix, as this can develop the gluten in the oats too much, leading to a tougher cookie. Pressing the cookies firmly before baking helps them maintain their shape and prevents crumbling. Keep an eye on them in the oven, as baking times can vary; look for that beautiful golden-brown edge as your cue that they’re done.
The beauty of this recipe truly lies in its versatility and how easily it can be adapted to your preferences or dietary needs. For the nuts, feel free to swap cashews and walnuts for almonds, pecans, or even pistachios – just ensure they are roughly chopped to distribute evenly. Similarly, the seeds offer a fantastic opportunity for customization; sunflower seeds, chia seeds, or ground flax seeds can be added or substituted for pumpkin and sesame seeds, boosting the nutritional profile even further. When it comes to dried fruits, dried cherries, chopped apricots, or even finely diced dates would make excellent additions or replacements for cranberries and raisins. If you prefer a less sweet cookie, you can slightly reduce the amount of honey or maple syrup, especially if your dried fruits are already quite sweet. For a richer, more decadent flavor, a tablespoon of unsweetened cocoa powder can be added to the dry ingredients, turning these into chocolatey energy bites. If you’re looking for an extra protein boost, a scoop of your favorite unflavored or vanilla protein powder can be mixed in with the dry ingredients, though you might need to add a tiny bit more liquid binder to maintain the dough consistency. For a truly unique flavor, try adding a pinch of ground ginger or a dash of almond extract alongside the vanilla.
To adjust the texture, if you prefer a chewier cookie, bake for the minimum recommended time and let them cool completely on the baking sheet to firm up slowly. For a crispier cookie, bake for an extra 2-3 minutes until the edges are a deeper golden brown; they will crisp up even more as they cool. If you’re making these for someone with a nut allergy, you can completely omit the nuts and increase the amount of seeds (like sunflower and pumpkin seeds) to maintain the texture and healthy fat content. For a gluten-free option, simply ensure you are using certified gluten-free rolled oats. And for a vegan version, the flax egg substitution works wonderfully, and ensure you use maple syrup instead of honey and coconut oil instead of butter. This recipe is incredibly forgiving, so don’t be afraid to experiment and make it your own!
Storage and Reheating
Proper storage is key to maintaining the freshness and delicious texture of your Healthy Oat Cookies. Once completely cooled, transfer the cookies to an airtight container. They will keep well at room temperature for up to 5-7 days. For extended freshness, especially in warmer climates or if you’ve made a large batch, you can store them in the refrigerator for up to 2 weeks. This can also enhance their chewiness and make them a delightful cool treat. If you want to keep them even longer, these cookies freeze beautifully. Arrange them in a single layer on a baking sheet and freeze until solid, then transfer them to a freezer-safe bag or container, separating layers with parchment paper to prevent sticking. They can be stored in the freezer for up to 3 months. When you’re ready to enjoy a frozen cookie, simply let it thaw at room temperature for about 15-30 minutes, or pop it in the microwave for 10-15 seconds for a quick, warm snack. Reheating is generally not necessary, as they are delicious at room temperature or chilled, but a few seconds in the microwave can soften them slightly if they’ve become too firm.
Frequently Asked Questions
How can I make these cookies vegan?
To make these healthy oat cookies entirely vegan, you will need to make two simple substitutions. First, replace the honey with an equal amount of maple syrup or agave nectar. Second, instead of using a large egg, prepare a “flax egg” by mixing 1 tablespoon of ground flaxseed with 3 tablespoons of water. Let this mixture sit for 5-10 minutes until it thickens to a gel-like consistency, then use it as you would the regular egg. Ensure you are also using coconut oil instead of butter if you want to avoid dairy.
Can I make these without baking them?
While this recipe is designed for baking, a no-bake version is certainly possible with a few adjustments. For a no-bake option, you would typically increase the amount of binding liquid (honey/maple syrup and coconut oil/butter) slightly to ensure the mixture is sticky enough to hold together firmly. You might also want to add a tablespoon or two of nut butter (like almond or peanut butter) to enhance the binding. After mixing, press the mixture very firmly into a pan, chill it in the refrigerator for at least 2-4 hours (or until very firm), then cut into squares or bars. The texture will be denser and chewier, more akin to an energy bar, rather than a soft-baked cookie.
What kind of oats are best for this recipe?
For the best texture and consistency in these healthy oat cookies, old-fashioned rolled oats are highly recommended. They provide a hearty, chewy texture and absorb moisture effectively without becoming mushy. Quick oats or instant oats can be used in a pinch, but they tend to break down more during mixing and baking, resulting in a less distinct oat texture. Steel-cut oats are not suitable for this recipe as they require much longer cooking times and will remain too hard in the cookie.
How can I prevent my cookies from crumbling?
If your cookies are crumbling, it’s usually an indication that the mixture isn’t cohesive enough or hasn’t been pressed firmly enough. Ensure you’ve used the correct amount of wet ingredients (honey/maple syrup, coconut oil/butter, and egg/flax egg) as these are crucial for binding. When forming the cookies, make sure to press the mixture very firmly together into a compact disc before placing it on the baking sheet. A slight increase in the binding liquid (e.g., an extra teaspoon of honey or a tablespoon of nut butter) can also help if your dry ingredients are particularly absorbent. Also, make sure to let the cookies cool completely on a wire rack after baking, as they firm up significantly as they cool.