Instructions
- Prepare the Dough: In a large mixing bowl, combine the all-purpose flour, fine semolina flour, salt, sugar (if using), and instant dry yeast (if using). Gradually add the warm water, starting with 1 ½ cups, mixing with your hands until a shaggy dough forms. If the dough is too dry, add more water, a tablespoon at a time, until it comes together.
- Knead the Dough: Transfer the dough to a lightly floured or oiled surface. Knead for 10-15 minutes until the dough is smooth, elastic, and no longer sticky. The dough should be soft and pliable. If you have a stand mixer with a dough hook, knead on medium speed for 8-10 minutes.
- Rest the Dough (First Rest): Lightly oil a clean bowl. Place the dough in the bowl, turning it once to coat with oil. Cover the bowl tightly with plastic wrap or a damp kitchen towel. Let the dough rest in a warm place for at least 30 minutes, or up to 1 hour. This resting period is crucial for gluten relaxation, making the dough easier to stretch.
- Divide the Dough: Once rested, gently punch down the dough. Divide the dough into 10-12 equal-sized balls, each about the size of a golf ball.
- Prepare for Shaping: Lightly oil a large tray or baking sheet. Place the dough balls on the oiled tray, ensuring they are well-spaced. Lightly brush the tops of the dough balls with oil to prevent them from drying out. Cover the tray loosely with plastic wrap and let the dough balls rest for another 15-20 minutes. This second rest will make them incredibly easy to stretch.
- Prepare the Work Surface and Oils: Set up your workstation. You will need a clean, flat surface (like a countertop) that you can generously oil. Have your vegetable oil and melted butter ready. Also, have a small bowl of extra fine semolina flour for dusting.
- Stretch the First Dough Ball: Take one dough ball. Generously oil your hands and the work surface. Place the dough ball in the center and begin to flatten it with your palms, working from the center outwards. Gently stretch the dough as thin as possible, almost transparent, into a large, irregular circle or square. Be careful not to tear it, but don’t worry if small holes appear – they will be hidden in the layers. The thinner you stretch it, the flakier your Msamen will be.
- Brush and Dust: Once stretched thin, brush the entire surface of the dough with a thin layer of melted butter. Lightly sprinkle a pinch of fine semolina flour over the buttered surface. This semolina will help create distinct layers and prevent sticking.
- Fold the Dough (Square Method): Take one edge of the stretched dough and fold it towards the center, covering about one-third of the dough. Brush this folded section with a little more melted butter and sprinkle with semolina. Then, take the opposite edge and fold it over the first fold, creating a long rectangle. Brush with butter and sprinkle with semolina again. Finally, fold one end of the rectangle towards the center, and then fold the other end over it, creating a neat square packet. This is your first Msamen.
- Repeat for Remaining Dough: Place the folded square on a separate oiled tray. Continue stretching and folding the remaining dough balls in the same manner. As you work, let the folded squares rest for a few minutes before cooking; this helps them relax and become easier to flatten for cooking.
- Cook the Msamen: Heat a heavy-bottomed non-stick pan or griddle over medium heat. Lightly grease the pan with a little oil.
- Flatten and Cook: Take one of the folded Msamen squares. Gently flatten it with your hands to your desired thickness (usually about ¼ to ½ inch thick), maintaining the square shape.
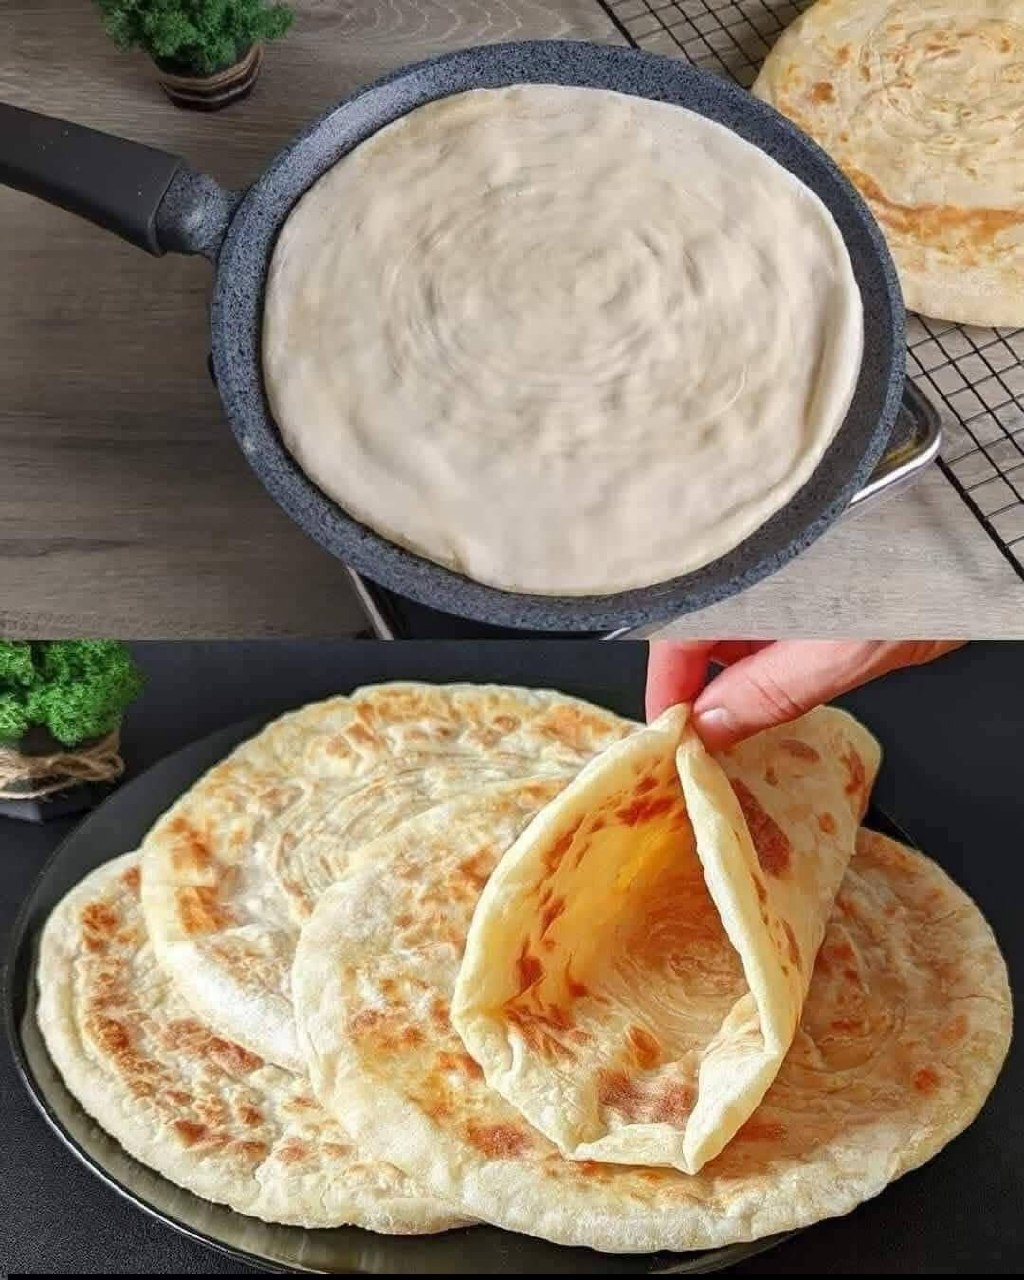
- Pan-Fry: Carefully place the flattened Msamen onto the hot pan. Cook for 2-3 minutes per side, or until golden brown, puffy, and cooked through. You may need to flip it a few times to ensure even browning. The layers should separate and become flaky.
- Serve: As each Msamen finishes cooking, transfer it to a plate or a cooling rack. You can gently clap the cooked Msamen between your hands to further separate the layers and release steam. Serve warm.
Cooking Tips and Variations
Dough Consistency is Key: The most crucial tip for successful Msamen is achieving the right dough consistency. It should be soft, supple, and very elastic after kneading. If it’s too stiff, it will be hard to stretch; if it’s too sticky, it will be difficult to handle. Don’t be afraid to adjust water slightly during kneading.
Generous Oiling: Don’t skimp on the oil! Oiling your hands, the work surface, and the dough balls prevents sticking and allows the dough to stretch thinly without tearing. It’s also essential for creating those distinct, flaky layers.
Resting Time is Non-Negotiable: Allow the dough to rest adequately at each stage (after kneading and after dividing into balls). Resting relaxes the gluten, making the dough incredibly pliable and easy to stretch to almost transparent thinness. Rushing this step will result in tough, unworkable dough.
Stretch Thin, Not Thick: The thinner you can stretch the dough, the more delicate and flaky your Msamen will be. Aim for it to be almost translucent. If it tears slightly, don’t worry too much; the folds will hide it.
Hot Pan, Medium Heat: Cook Msamen on a medium-hot pan. If the pan is too hot, it will burn before cooking through. If it’s not hot enough, it will dry out and become tough. Medium heat ensures a golden-brown exterior and thoroughly cooked layers.
Don’t Overcrowd the Pan: Cook Msamen one or two at a time, depending on the size of your pan. Overcrowding will lower the pan temperature and result in uneven cooking.
Clap for Fluffiness: After cooking, gently clap the Msamen between your hands. This traditional technique helps separate the layers and makes the bread even flakier and lighter.
Practice Makes Perfect: The stretching and folding technique takes a little practice. Don’t get discouraged if your first few aren’t perfect. You’ll quickly get the hang of it!
Variations:
- Sweet Msamen: Serve warm with a generous drizzle of honey, a dollop of apricot jam, or a sprinkle of powdered sugar.
- Savory Msamen: Enjoy alongside a fried egg, a sprinkle of cheese, or as a side to a hearty Moroccan tagine or stew.
- Stuffed Msamen (Rghayef Maamar): Before the final fold, you can add a savory filling to the center of the stretched dough. Popular fillings include finely diced onions sautéed with spices (like cumin, paprika, and harissa), ground meat, or even cheese and herbs. Fold the dough around the filling before cooking.
- Round Msamen: While traditionally square, some regions also make round Msamen. The folding technique is slightly different, usually involving folding the stretched dough into a circle by bringing edges to the center.
- Semolina Ratio: Adjust the ratio of all-purpose flour to semolina. More semolina will give a slightly chewier texture and a more rustic feel, while less will result in a softer, more delicate Msamen.
- Herbal Infusion: For savory versions, you can add finely chopped fresh herbs like parsley or cilantro to the dough or the melted butter mixture.
Storage and Reheating
Msamen is best enjoyed fresh and warm, straight from the pan. However, leftovers can be stored and reheated for later enjoyment.
Storage:
- Room Temperature: Cooked Msamen can be stored at room temperature for up to 1-2 days. Place them in an airtight container or wrap them tightly in plastic wrap to prevent them from drying out.
- Refrigerator: For longer storage, Msamen can be refrigerated for up to 4-5 days. Again, store them in an airtight container or well-wrapped to maintain freshness.
- Freezer: Msamen freezes exceptionally well! Once completely cooled, stack them with parchment paper in between each piece to prevent sticking. Place the stack in a freezer-safe bag or airtight container. They can be frozen for up to 2-3 months.
Reheating:
- Pan-Frying (Recommended for Best Texture): This method is ideal for bringing back that fresh-from-the-pan crispiness.
- Heat a non-stick pan over medium heat. Do not add oil unless the Msamen seems very dry.
- Place the Msamen directly into the dry pan.
- Heat for 1-2 minutes per side, or until warmed through and the layers begin to crisp up again. For frozen Msamen, you can reheat directly from frozen, adding a couple of extra minutes per side.
- Oven: This method works well, especially if reheating a larger batch.
- Preheat your oven to 350°F (175°C).
- Place the Msamen on a baking sheet.
- Heat for 5-10 minutes, or until warmed through and slightly crispy. If reheating from frozen, it might take 10-15 minutes.
- Microwave (Not Recommended for Texture): While convenient, the microwave tends to make Msamen soft and chewy rather than flaky. Use only if you’re in a hurry and don’t mind the change in texture.
- Place Msamen on a microwave-safe plate.
- Heat for 15-30 seconds per piece, or until warm.
Frequently Asked Questions
What is the difference between Msamen and Rghayef?
Msamen and Rghayef are essentially the same Moroccan flatbread, characterized by their flaky, layered texture. The terms are often used interchangeably, though “Msamen” is more widely recognized. In some regions, “Rghayef” might specifically refer to the square-shaped version, while “Msamen” can encompass both square and round forms. Both rely on the same fundamental stretching and folding technique to create their signature layers.
Can I make Msamen without semolina flour?
While fine semolina flour contributes significantly to the unique texture and slight crispiness of Msamen, you can make it using only all-purpose flour. However, the resulting Msamen might be softer and less chewy. If you don’t have fine semolina, you can substitute it with an equal amount of all-purpose flour, but be aware of the slight textural difference. Some recipes also use a small amount of coarse semolina for dusting the layers, which can still be beneficial even if not in the dough itself.
Why is my Msamen dough tearing when I try to stretch it?
If your Msamen dough is tearing, it’s usually due to one of two reasons: either the dough hasn’t rested enough, or it’s not adequately oiled. Resting the dough allows the gluten to relax, making it much more pliable and elastic. Ensure you give it at least 30 minutes after kneading and another 15-20 minutes after dividing it into balls. Also, be generous with oiling your hands and the work surface; this lubrication is crucial for the dough to stretch thinly without resistance. A dough that is too dry can also tear easily, so ensure it’s soft and pliable after kneading.
Can I prepare Msamen dough in advance?
Yes, you can prepare Msamen dough in advance. After kneading, you can place the dough in an oiled bowl, cover it tightly with plastic wrap, and refrigerate it for up to 24 hours. When you’re ready to make Msamen, take the dough out of the refrigerator about an hour before you plan to use it to allow it to come closer to room temperature. Then, proceed with dividing it into balls and following the rest of the recipe instructions. This can be a great way to break up the preparation process.